Crypto Position Sizing: 1% Baseline, ATR Stops, and 6% Portfolio Heat

That is the default, not a suggestion to tweak on a whim. “Risk” here means the dollar amount you lose if your stop-loss triggers, not the size of the position itself.
TL;DR:
- Risk in crypto trading should generally stay between 1% and 2% per trade, with higher risk only justified by a well-documented edge and proven results.
- Position size is calculated after setting the stop loss based on chart structure, then dividing the dollar risk by your per-unit risk while factoring in fees and slippage.
- ATR-based stops adjust for volatility and should be set 1.5 to 2 times the 14-day ATR, with wider stops for high-volatility assets and tighter for low-volatility ones.
- Portfolio heat caps the total dollar risk across all open positions at around 6%, requiring risk adjustment or position reduction if exceeded.
- Automating risk management rules with tools like Darkbot reduces discipline failures by applying consistent sizing, enforcing caps, and removing emotional decision-making.
What Does Risk Per Trade Actually Mean in Crypto?
Before sizing anything, separate two numbers that traders routinely confuse: position size and risk. Position size is how much capital you put into a trade. Risk is how much of that capital you lose if the trade fails and your stop triggers.
Fixed-fractional position sizing calculates the exact number of coins or contracts to buy so that a stop hit costs a fixed slice of your account, typically between 0.5% and 2%. This approach is standard across quantitative trading because it scales automatically. As your account grows, dollar risk grows with it; as it shrinks, risk shrinks too.
- New or unproven strategy: 0.5% to 1% per trade until you have a real sample of results.
- Established edge, standard setup: 1% is the workhorse figure most systematic traders default to.
- Rare A+ setup with documented history: up to 2%, and rarely higher.
Statistic: CME Group’s education material on the “2% rule” treats 2% as the outer boundary for single-trade loss protection, not a target to hit on every position. Very small accounts (under a few hundred dollars) run into a separate problem: exchange minimum order sizes and flat fees can force risk above your target percentage regardless of the math.
The Position-Sizing Formula (Step-by-Step)
The formula is simple, but the order of operations matters more than the arithmetic. You set the stop first, based on where the trade idea is actually invalidated on the chart. Only then do you calculate how many units that stop distance allows you to buy. Investopedia’s position-sizing framework calls this stop-first, size-second, and it is the single habit that separates disciplined sizing from guesswork.
Formula: Position units = (Account balance × Risk%) ÷ (Entry price − Stop price)
- Choose your risk percentage (1% is the default).
- Identify the stop price from chart structure, not from a round number or gut feeling.
- Calculate dollar risk: Account balance × Risk%.
- Calculate per-unit risk: Entry price minus stop price.
- Divide dollar risk by per-unit risk to get position units.
- Subtract estimated fees and slippage from the dollar-risk figure before dividing, so the real loss (including costs) still caps at your target percentage.
Leverage does not change this math. It changes how much margin you post to control that position, not how much you’re risking in dollar terms. A leveraged position with a stop still caps your loss at the same dollar figure, provided the stop actually executes at the price you planned.
Adjust for Volatility: ATR-Based Stops and Stop-Placement Rules
The Average True Range over 14 days measures how much an asset typically swings and gives you a volatility-adjusted stop distance instead of an arbitrary one. Common practice sets stops 1.5 to 2 times the 14-day ATR away from entry.
- A low-ATR asset like Bitcoin might need a stop just 3% away to avoid normal noise.
- A high-ATR altcoin might need a stop 10% or 15% away for the same statistical breathing room.
- Wider stops mean fewer units purchased for the same dollar risk, which is the point, not a flaw.
Sometimes the ATR-based stop distance forces a position size that is impractical, smaller than an exchange’s minimum order or too small to matter. When that happens, the correct move is to skip the trade or reduce your risk percentage further, not to widen the stop past where the trade idea is actually invalidated.
Pro Tip: Never move a stop further away just to fit a bigger position size. If the math says the position should be tiny, respect it. A skipped trade costs you nothing; a moved stop can cost you the whole risk budget on a coin flip.
Portfolio Heat: Capping Your Aggregate Open Risk
Portfolio heat is the sum of dollar risk across every open position, and a two-layer risk system caps that aggregate figure separately from per-trade sizing, commonly around 6% of equity.
- List every open position and its stop-loss price.
- Calculate the dollar risk for each (same formula as single-trade sizing).
- Sum all the individual dollar-risk figures into one portfolio heat number.
- Before opening a new position, check whether adding its risk would breach your cap.
- If it would, reduce the new trade’s size or skip it until an existing position closes.
Common Sizing Mistakes and a Pre-Trade Checklist
Most sizing failures aren’t math errors. They’re discipline failures dressed up as strategy.
- Sizing by coin count instead of dollar risk. Buying “10 units” of anything tells you nothing about what you’re risking.
- Moving the stop after entry to avoid taking a loss, which quietly turns a 1% risk into something much larger.
- Ignoring fees and slippage, which on thin altcoin order books can eat a meaningful chunk of the intended risk budget.
- Overlooking correlation, treating five altcoin longs as five separate risks instead of one concentrated bet.
Before every trade, run through this: size calculated in USD risk, stop set from chart structure first, fees factored in, portfolio heat checked, trade logged. That last step matters more than traders admit. Darkbot’s risk checklist for the 1-2% rule walks through this same sequence in more detail.
Pro Tip: Paper-test any new sizing approach for 30 to 90 days before risking real capital on it. Expectancy claims that look good in a backtest often fall apart against live spreads and slippage.
Worked Examples: Three Position-Sizing Calculations
Numbers make this concrete. Here are three scenarios using the same formula with different accounts and volatility conditions.
- Example 1 shows a straightforward calculation on a liquid asset with a tight, structure-based stop.
- Example 2 shows how a wider ATR-based stop on a volatile altcoin produces fewer risk dollars per point of price movement but the same dollar-risk cap.
- Example 3 shows the friction problem: at $500, 1% risk is only $5, and exchange minimums or flat fees can consume most of that budget. The conservative workaround is trading a larger notional amount but accepting a wider effective stop, or simply building the account before trading it actively.
When to Deviate from the 1% Baseline
Deviating from it should require evidence, not confidence.
- Raising risk toward 2% is defensible only for a documented setup with a real sample size behind it, ideally tracked through R-multiples and expectancy rather than gut feel.
- Pyramiding into winners means adding to a position only after it has moved in your favor and the stop has been tightened to protect prior gains, never adding to a loser.
- After a drawdown, cut risk to 0.25% to 0.5% until performance stabilizes, and set a hard threshold (many traders use 15% to 20% account drawdown) where you stop trading entirely and review the process.
How Darkbot Enforces These Rules in Practice
Manual sizing breaks down under stress. The math is simple, but fatigue, impatience, and the temptation to move a stop are not. Darkbot’s automation architecture maps every rule in this guide directly to a system control instead of a habit you have to remember mid-trade.
- Risk percentage, stop distance, and position-size calculation run server-side, removing the manual arithmetic step where errors creep in.
- Portfolio-heat caps apply across all active bots simultaneously, so correlated positions don’t quietly stack into one oversized bet.
- Backtesting and paper trading let you validate expectancy on a strategy before committing real capital, the same 30 to 90 day discipline recommended above.
- Real-time analytics track R-multiples and drawdown, so sizing decisions stay grounded in data rather than memory.
Darkbot’s post on risk management in automated bots covers the execution side of this in more depth, and its portfolio balancing guide extends the heat-cap concept across a full automated portfolio.
Understanding Risk Tolerance and Its Impact on Sizing Decisions
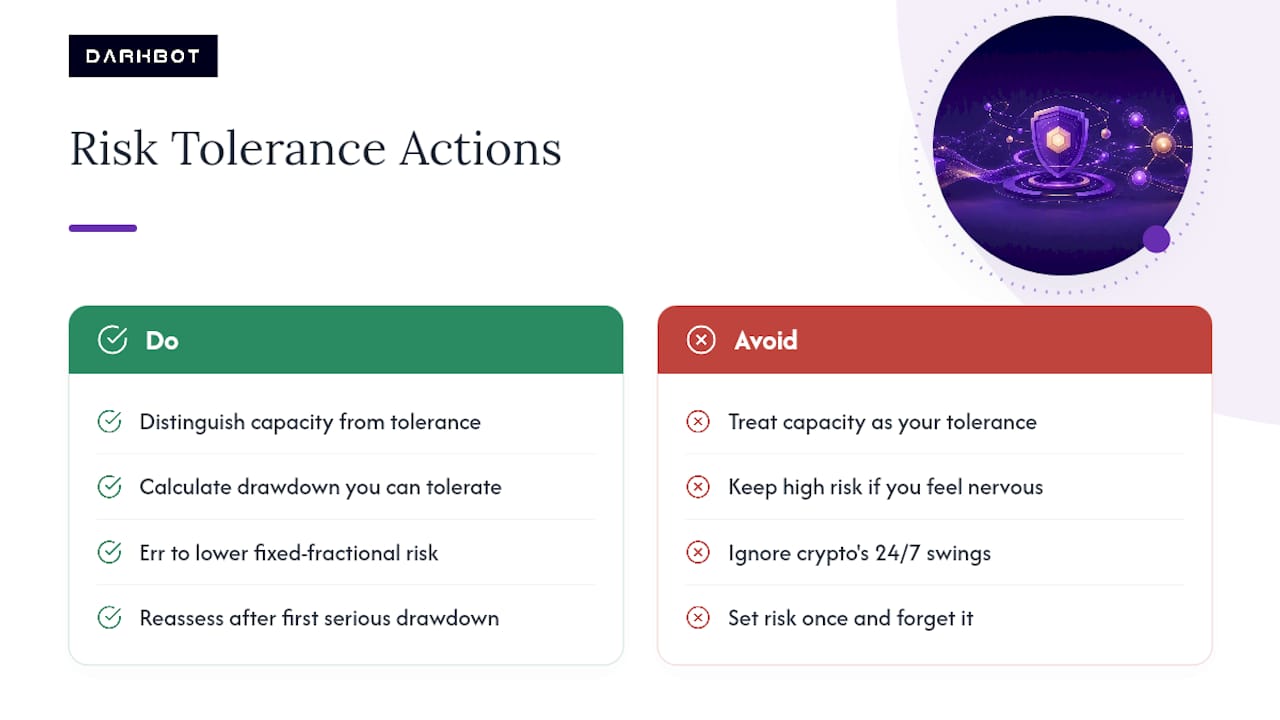
Risk tolerance is not the same as risk capacity, and conflating the two is where a lot of sizing decisions go wrong. Capacity is what your account can mathematically survive. Tolerance is what you can psychologically sit through without breaking your own rules mid-trade.
Assessing tolerance honestly means asking what drawdown, in real dollars, you can watch happen without abandoning your process. If a $500 loss on a single trade makes you check your phone every ten minutes, your risk percentage is set too high for your actual tolerance, regardless of what the math says you can technically afford.
Crypto adds a layer most traditional asset classes don’t have: prices move around the clock, and drawdowns can happen while you’re asleep. That reality argues for erring toward the lower end of the fixed-fractional range, especially early in a trading career, until you have firsthand evidence of how you behave during a losing streak rather than a theory about how you’d behave.
Risk tolerance also shifts with life circumstances, account size, and experience. It is worth reassessing periodically rather than setting once and forgetting, particularly after your first serious drawdown, which tends to be the most accurate test of what your real tolerance is.
The Psychological Side of Managing Risk in Volatile Markets
The math behind fixed-fractional sizing is not the hard part. Crypto’s volatility and 24/7 trading cycle amplify psychological pressure in ways slower markets don’t.
Overconfidence after a winning streak pushes risk percentages up gradually, often without a conscious decision to raise them. Both patterns are well-documented failure modes, and disciplined, rule-based decision frameworks are one of the few reliable countermeasures across high-risk domains generally, not just trading, since removing discretionary judgment at the moment of stress reduces the frequency of large-loss outcomes.
A trading journal is the simplest tool against this. Logging every trade’s planned risk, actual risk, and the reasoning behind any deviation creates a record you can review honestly, away from the emotional pressure of an open position. Patterns emerge quickly: most undisciplined sizing decisions cluster around a handful of repeated triggers, like trading after a loss to “get it back” or increasing size on a setup that feels obvious but has no track record behind it.
Adjusting Risk Per Trade for Market Conditions and Volatility Regimes
Crypto markets move between distinct volatility regimes, and treating every period the same is a common, avoidable mistake. A quiet consolidation phase with low ATR readings behaves nothing like a high-volatility breakout or a market-wide liquidation cascade, and your risk percentage should reflect that difference.
During low-volatility regimes, stops can sit tighter relative to price without getting triggered by noise, which means your position sizes for a given dollar risk can be larger. During high-volatility regimes, the same dollar risk produces a smaller position because the ATR-based stop distance widens. This is the volatility-adjusted sizing mechanism doing its job automatically, provided you recalculate ATR regularly rather than using a stale reading from a calmer period.

Regime shifts also argue for adjusting the risk percentage itself, not just the stop distance. Some systematic traders cut their per-trade risk percentage during confirmed high-volatility regimes (sharp increases in realized volatility across the broader market) even before any individual trade goes wrong, on the logic that correlation between assets tends to rise sharply during market stress. Financial Stability Board research on systemic risk makes a similar point at the market level: diversification benefits shrink exactly when they’re needed most, during periods of broad market stress. The practical takeaway for an individual trader is the same: treat calm and turbulent markets as different risk environments, not the same rule applied blindly across both.
A Final Word on Discipline and the Long Game
Survival is the strategy, not a side effect of one. Keep a trading journal. Review it without flattering yourself. Proper sizing doesn’t guarantee profit; it protects your optionality to keep learning until your process actually works.
— Grisha
Automate the Rules Instead of Relying on Willpower
Discipline is easy to describe and hard to hold under pressure, especially at 3 a.m. when a position moves against you. Darkbot is built to remove that gap between the rule and the execution: it applies your risk percentage, calculates position size from your stop distance, and enforces a portfolio-heat cap across every active bot, all without requiring you to do mental math while a trade is live.
The platform’s API integration connects directly to major exchanges, so sizing decisions execute server-side rather than depending on you catching every entry manually. Backtesting and paper trading let you validate a strategy’s expectancy over 30 to 90 days before committing real capital, and real-time analytics track R-multiples so you can see whether your edge is holding up or eroding. If you want to see how automated, rule-based sizing behaves on your own account, start with Darkbot’s platform and configure your risk parameters before your next trade.
Sources
For more on the reasoning behind these rules: CME Group’s breakdown of the 2% rule covers the industry-standard heuristic. Investopedia’s guide to determining position size walks through the core formula with examples. For advanced sizing theory, the Kelly criterion explains optimal-fraction betting and why it demands caution without a long track record.
- The 2% Rule
- Determine Position Size — Investopedia
- Position sizing for crypto traders: a two-layer risk system
FAQ
Is 3% Risk Per Trade Good in Crypto?
It is not reckless on its own, but it requires a documented, tested edge to justify.
Is 5% Risk Per Trade Too Much?
Yes, for nearly all individual traders.
What Is the 1% Rule in Crypto Trading?
It is calculated from the stop distance and position size, not from the notional value of the position.
How Much Should You Risk Per Trade in Crypto?
Platforms like Darkbot can enforce this percentage automatically once it’s configured.
Recommended

Start trading on Darkbot with ease
Come and explore our crypto trading platform by connecting your free account!
Free plan available • No credit card required