Automated Arbitrage Workflow: A Step-by-Step Guide
TL;DR:
- Manual crypto arbitrage appears straightforward but is hindered by rapid price gaps and execution errors. An automated workflow enhances speed, precision, and risk management by systematically detecting opportunities, calculating profitability, and executing trades with safeguard protocols. Building these systems requires multiple exchange accounts, API keys, backtesting capabilities, and rigorous risk controls to ensure sustainable arbitrage performance.
Manual crypto arbitrage sounds simple on paper: buy low on one exchange, sell high on another, pocket the difference. In practice, price gaps close in milliseconds, fees eat into margins, and one botched execution can turn a promising trade into a painful loss. Traders who rely on manual processes frequently miss windows entirely or, worse, get caught with one leg of a trade filled and the other failing. A structured, automated arbitrage workflow solves these problems by replacing reaction time and guesswork with speed, precision, and repeatable logic built on solid risk controls.
Key Takeaways
| Point | Details |
|---|---|
| Workflow steps | A robust arbitrage workflow includes detection, profitability checks, risk guardrails, and continuous monitoring. |
| Critical guardrails | Minimum spread, max slippage, exposure limits, and order timeouts protect against costly edge cases. |
| Staged deployment | Simulate and paper trade before committing real capital to minimize risk. |
| Importance of monitoring | Ongoing tracking and auto-pause features catch failures before losses mount. |
| Beyond speed | Sustainable automation prioritizes risk management over sheer trade frequency. |
What is an automated arbitrage workflow?
If you’ve ever tried to execute a price discrepancy trade by hand, you already know the frustration. By the time you spot the gap, log into two exchanges, and place both orders, the spread is gone. Understanding arbitrage trading basics is the starting point, but turning that knowledge into consistent results requires something more systematic.
An automated arbitrage workflow is a structured, repeatable series of steps that a trading bot executes without manual input. It is not simply “a bot that trades.” It is a designed process where each stage feeds the next, and failure at any stage triggers a defined response rather than chaos.
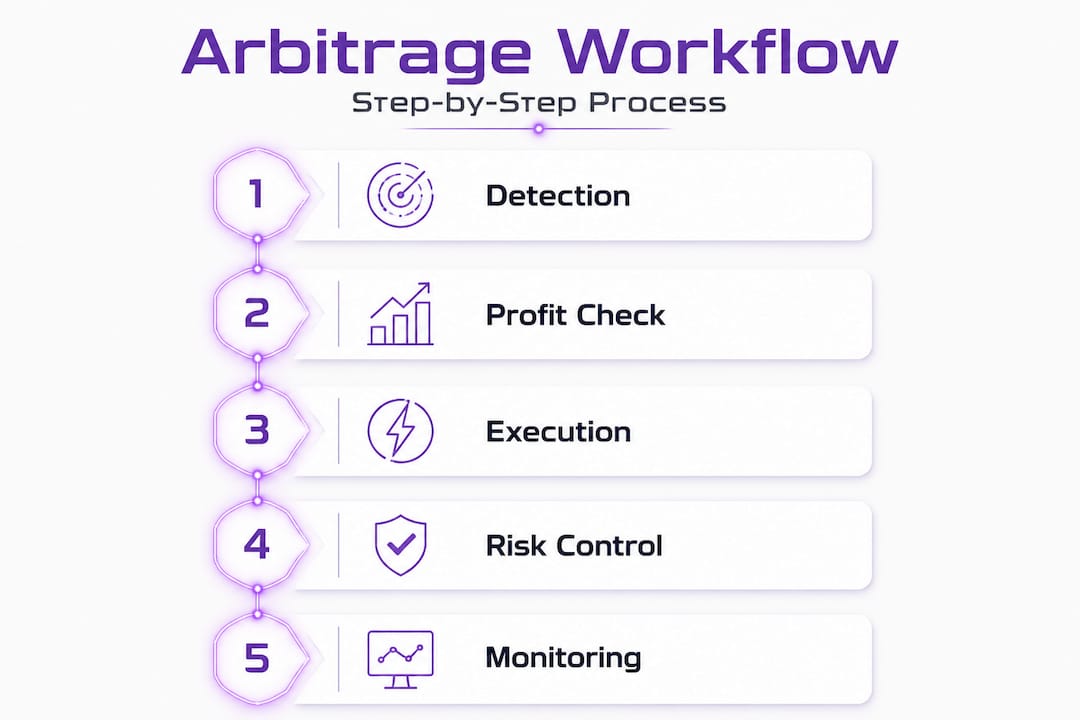
According to one detailed arbitrage workflow breakdown, a well-structured workflow can be decomposed into five core modules: opportunity detection from multi-venue quotes, profitability calculation after all fees and costs, robust execution, risk guardrails, and monitoring plus staged deployment. Each module is essential. Skip one and the entire system becomes unreliable.
Here’s a quick look at how the three common approaches compare:
| Approach | Speed | Error rate | Risk controls | Scalability |
|---|---|---|---|---|
| Manual trading | Slow | High | Inconsistent | Very limited |
| Basic bot automation | Fast | Moderate | Minimal | Moderate |
| Optimized workflow | Very fast | Low | Systematic | High |
The key difference between a basic bot and an optimized workflow is the presence of intelligent guardrails and monitoring. Speed alone is not the edge. Structure is.
Core modules in a robust automated arbitrage workflow:
- Opportunity detection: Continuously aggregating price data from multiple venues in real time
- Profitability calculation: Modeling fees, slippage, and latency before committing to a trade
- Execution engine: Placing, confirming, and adjusting orders with no manual input
- Risk guardrails: Enforcing hard limits on exposure, slippage, and trade age
- Monitoring and deployment: Tracking performance and responding automatically to failures
If you are new to building these kinds of systems, reviewing a beginner’s automation workflow before going further will help you avoid common setup mistakes.
What you need to build an automated arbitrage workflow
Once you understand what an automated arbitrage workflow is, make sure you have the necessary resources before you start. Jumping in without the right tools is one of the most common reasons traders see poor results even with automation in place.
Essential prerequisites:
- Exchange accounts: You need active accounts on at least two exchanges, whether centralized (CEX) or decentralized (DEX). More venues mean more opportunity detection.
- API keys: Each exchange account must be connected to your bot via API. Understand read vs. trade vs. withdrawal permissions before configuring anything.
- A trading bot or development environment: Either a managed platform or a custom-coded solution capable of running your logic continuously.
- Backtesting and simulation capability: You must be able to test your strategy against historical data before any real capital is involved.
- Basic programming knowledge: Not always required if you use a managed platform, but understanding the logic your bot follows is critical regardless.
- Rule-based risk management features: Your system needs hard-coded limits, not just soft preferences.
The leading popular trading frameworks consistently emphasize three non-negotiables: multi-venue control, simulation and backtesting functionality, and rule-based risk management. If any of these are missing from your setup, you are operating with a meaningful blind spot.
Here is a practical overview of what each tool or resource does in the workflow:
| Resource | Purpose | Priority level |
|---|---|---|
| CEX/DEX accounts | Venue access for multi-market quotes | Critical |
| API keys | Bot-to-exchange connection | Critical |
| Backtesting engine | Pre-deployment strategy validation | Critical |
| Simulation mode | Safe environment for logic testing | High |
| Risk rule configuration | Hard limits on losses and exposure | Critical |
| Monitoring dashboard | Real-time performance visibility | High |
Exploring top arbitrage tools and reviewing automated trading systems will give you a clearer picture of which platforms offer these capabilities out of the box versus which require custom configuration.
Pro Tip: Never grant withdrawal permissions to your trading bot’s API key. Read and trade permissions are sufficient for arbitrage, and restricting withdrawals significantly limits your exposure if an API key is ever compromised.
Step-by-step: Setting up your automated workflow
With everything in place, you’re ready to start building. Here is the practical step-by-step process, broken down so each stage builds logically on the last.
1. Set up real-time opportunity detection

Your bot needs to pull live price quotes from all connected exchanges simultaneously. The detection layer compares prices for the same asset across venues, flagging any spread that exceeds your minimum threshold. This has to happen continuously and with minimal latency. A delay of even a few seconds at this stage can make a profitable spread unprofitable by the time execution begins.
2. Calculate profitability after all costs
Never commit to a trade based on the raw spread. Your calculation must factor in exchange trading fees (maker and taker), estimated slippage (price movement during order fill), network transfer fees if assets move between venues, and latency risk. A spread that looks like 0.8% often becomes 0.1% or less after costs. Only opportunities that clear your minimum net edge threshold should proceed.
3. Build a robust execution engine
This is where most naive bots fall short. A truly robust execution engine must include order placement, acceptance confirmation, fill tracking, and cancellation or adjustment logic when quotes go stale. Slippage must be modeled with conservative assumptions, not optimistic ones. The workflow module details confirm that both legs of the trade must be tracked independently, with clear logic for what happens if one leg partially fills or fails entirely.
4. Configure your risk guardrails
Before any live execution, define your hard limits:
- Minimum net edge required to enter a trade
- Maximum exposure per trade or per time window
- Maximum acceptable slippage before canceling
- Order age timeout (cancel if not filled within X seconds)
These guardrails are not optional features. They are the difference between a self-correcting system and one that compounds losses automatically.
5. Run staged deployment
Do not go live immediately. The correct sequence is: backtest against historical data, run the strategy in simulation mode (paper trading with no real capital), then deploy with a small live allocation. Only scale up after each phase produces consistent, expected results.
“A practical automated crypto arbitrage workflow can be decomposed into: spread and opportunity detection, conservative profitability calculation, robust execution, risk guardrails, and staged deployment plus monitoring.” This structure applies whether you are building from scratch or configuring a managed platform.
6. Set up monitoring and alerts
Your bot must report on every order: filled, partially filled, canceled, or failed. Set up automated alerts for any deviation outside expected parameters, and know in advance what action gets triggered when an alert fires. Exploring streamlining strategy execution gives concrete examples of how alert structures feed into execution logic.
Pro Tip: Set your slippage cap conservatively during the first weeks of live deployment. You can always loosen it once you have enough data to understand how your target markets actually behave under different conditions.
Handling risk: Guardrails and edge-case management
A robust workflow beats naive automation by anticipating and defending against hidden risks. The most dangerous scenario in automated arbitrage is not a slow detection engine. It is an uncontrolled edge case that your system was not designed to handle.
The most critical edge case is asymmetric fill failure. This happens when one leg of your arbitrage trade executes successfully but the other leg fails or only partially fills. Now you hold an asset position that was supposed to be immediately offset. Instead, you are exposed to raw market movement with no hedge. The asymmetric failure risk is a documented challenge for any CEX/CEX or CEX/DEX bot, and risk controls must include explicit hedging logic, timeout protocols, and inventory balance management.
Guardrails every automated arbitrage workflow needs:
- Minimum edge enforcement: The bot will not execute unless the net spread clears a defined profit threshold after all fees and slippage estimates
- Maximum slippage cap: If the expected fill price deviates beyond a set percentage, the order is canceled, not adjusted
- Order age timeout: Any open order that exceeds a defined time window is automatically canceled to prevent fills on stale quotes
- Inventory rebalancing logic: When one leg fails, the bot triggers a predefined response, whether that is a hedging order, a position reduction, or a full pause
- Pause triggers: Specific anomaly conditions, such as a sudden spread collapse, unusual latency spikes, or repeated fill failures, should trigger an automatic pause rather than continued execution
Reviewing risk management in bots and working through a risk checklist before going live will help you identify gaps in your current guardrail setup.
“Failure to account for asymmetric execution is one of the most common and most expensive mistakes in automated arbitrage. The bot fills on side A, side B quotes move, and suddenly a market-neutral strategy is carrying directional risk it was never meant to hold.”
Pro Tip: Build your inventory rebalancing response before you need it. Trying to write that logic after an asymmetric failure occurs is like designing a fire exit while the building is burning. Define the response in advance, test it in simulation, and trust it to execute automatically.
Monitoring and optimizing your arbitrage workflow
Now that your workflow is protected by robust guardrails, let’s make sure it continually performs and improves over time. A workflow that is not actively monitored will drift from its original performance parameters, often silently.
1. Set up real-time performance monitoring
Track every meaningful metric as it happens: fill rates, average slippage per trade, order cancellation rates, balance drift across venues, and net P&L after fees. If any of these metrics move outside expected ranges, you need to know immediately, not in your morning review.
2. Follow the staged deployment model
Best-practice staged deployment moves from read-only monitoring, to paper trading with simulated fills, to small-scale live trading, with auto-pause triggered on unexpected failures at every stage. Do not skip phases to save time. The capital you protect during testing is almost always worth more than the profits you might have captured by going live sooner.
3. Build automatic alert and response protocols
Configure alerts for: order rejection rates above a threshold, slippage exceeding your cap more than a set percentage of the time, balance imbalances across venues above a defined level, and any system errors. Each alert should have a defined response, whether that is a notification, a pause, or an automated corrective action.
4. Benchmark and iterate
Compare current performance against your simulation baseline. If live results consistently underperform your backtested expectations, something in your model is wrong. Common culprits include underestimated fees, latency differences between simulation and live environments, and changing market microstructure. Use the benchmarking data to refine your profitability calculations and slippage models. The optimization for ROI process is iterative, not a one-time configuration.
Pro Tip: Review your monitoring dashboard at a set time each day, even if no alerts fired. Small, gradual drifts rarely trigger thresholds but can add up to significant underperformance over weeks.
Why expert-level automation is about risk control, not just speed
Here is a perspective that most guides will not tell you directly: speed is overrated as an edge in automated arbitrage, and risk control is severely underrated.
The traders who blow up automated systems almost never do so because their detection was too slow. They fail because they did not account for edge cases, did not test their guardrails thoroughly, or treated risk routines as optional polish rather than core product features. The risk control strategies that matter most are not glamorous. Inventory management, timeout logic, minimum edge enforcement: none of these show up in headline metrics. But they are what keep a profitable strategy profitable over months rather than weeks.
Sustainable arbitrage automation is fundamentally a discipline of controlled exposure. The best operators we have seen are not the ones chasing the smallest latency. They are the ones who know exactly what their bot will do when things go wrong, and who have tested that response under every scenario they could imagine. Build your edge into your guardrails first. Speed improvements are valuable, but only once the risk layer is airtight.
Take your automated arbitrage to the next level
Building a safe, effective arbitrage workflow from scratch takes time, technical skill, and a lot of testing. If you want to implement these concepts without the overhead of custom development, a managed platform can dramatically reduce that barrier.
Darkbot.io gives you AI-powered automation with built-in risk guardrails, multi-exchange API integration, and real-time monitoring, all designed so you can deploy structured arbitrage strategies without writing a single line of code. From staged deployment support to portfolio-level risk controls, the platform handles the infrastructure so you can focus on strategy. Explore portfolio optimization tools to see how Darkbot pairs arbitrage automation with full portfolio oversight, keeping your entire allocation balanced while your bots run.
Frequently asked questions
What is the main risk in crypto arbitrage automation?
The primary risk is asymmetric order execution, where one side of a trade fills but the other fails, leaving you with unhedged directional exposure to market moves.
Which guardrails are essential for automated arbitrage bots?
Essential guardrails include minimum profitable spread after fees, max exposure limits, slippage controls, timeout and cancellation logic, and continuous failure monitoring, all configured before any live capital is deployed.
How can I test an automated workflow before risking capital?
Use staged deployment: begin with historical backtesting, move to paper trading with simulated fills, and only apply real capital once your setup performs consistently across both phases.
Can automated arbitrage bots operate on both CEX and DEX platforms?
Yes, advanced bots are built for multi-venue detection across both centralized and decentralized exchanges, though CEX/DEX strategies require additional handling for on-chain settlement latency and gas fees.
What ongoing monitoring is necessary for an automated arbitrage workflow?
You need live tracking of order fill rates, slippage levels, and balance drift across venues, plus auto-pause on failures to prevent compounding losses when anomalies occur.
Recommended

Start trading on Darkbot with ease
Come and explore our crypto trading platform by connecting your free account!
Free plan available • No credit card required